The ‘60s are calling… they want their hair to make a comeback
When it comes to embracing ‘60s style, there’s one look that immediately springs to mind—the iconic beehive. Whether you’re prepping for a throwback party, dressing up for Halloween, or just vibing with that retro aesthetic, we’ve all had that moment where we reach for a comb and start backcombing like our lives depend on it. But let’s be real, getting that perfectly sculpted hive isn’t as easy as it looks. If you’ve ever found yourself halfway through the process, staring at a lopsided, frizzed-out mess, you’re not alone. We’ve all been there, babe.
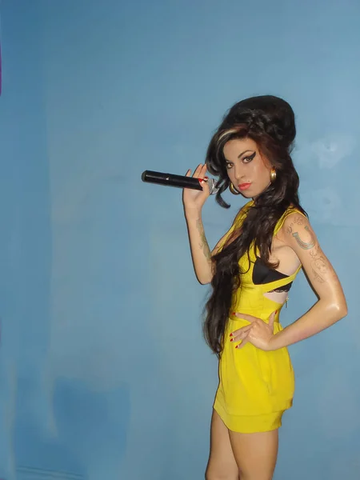
The truth is, the beehive hairstyle is a work of art—one that requires just the right technique, the right tools, and a whole lot of hairspray. But when you nail it, oh, it’s a vibe. We’re talking about a look that’s been sported by everyone from Priscilla Presley to Amy Winehouse, and if Amy were here, you just know she’d be giving you a nod of approval for getting it right.
So why settle for an “almost” when you can get that perfect beehive every time? We’re all about learning, perfecting, and bringing this iconic style into the now, with a little bit of a modern touch. Ready to master the beehive and resurrect the queen of the beehive? Let’s get into it because this is one hairstyle that deserves to be done right, and we’ve got a step-by-step guide to help you slay it.
The '60s beehive hairstyle has to be done right
If you’re going to do the beehive, you’ve got to do it like they did in the ‘60s—with flair, volume, and just a touch of rebellion. Back then, the beehive wasn’t just a hairstyle, it was a symbol. Women were breaking molds, pushing boundaries, and their hair was right there with them, defying gravity and turning heads. Think Priscilla Presley’s sleek mob-boss era, Dusty Springfield’s sultry height, or Brigitte Bardot’s effortless sex appeal. These women didn’t just wear the beehive—they owned it.
But here’s the thing—the beehive isn’t just about piling your hair on top of your head and hoping for the best. It’s an art form, and like any good art, it requires the right tools, the right technique, and a whole lot of confidence. The key to nailing this look lies in the foundation…literally. You’ve got to start with a solid base, teasing and backcombing until you’ve built the structure that will hold your hive high and proud.
And let’s not forget the hairspray. This is your *secret* weapon, the magic that keeps everything in place while you dance the night away. But don’t worry, we’ll guide you through every step, from the initial backcomb to the final spritz, so you can be sure your beehive is the perfect mix of retro and right now.
Ready to bring a little ‘60s magic into your life? If you’re channeling your inner Bardot or adding a modern twist, we’ve got the tips, tricks, and tools to help you do it right.
From the ‘60s icons to today’s IT-girls
There’s no one way to master the beehive, and the queens of this iconic style have shown us just how versatile it can be. Take a cue from Priscilla Presley, who originally defined the look with her high, sleek crown and polished sides. Her version set the bar for ‘60s glamor and remains a classic to this day.
Then there’s Amy Winehouse, who revived the beehive in the early 2000s with her signature sky-high, rock ‘n’ roll twist. Her take was all about adding a bit of messy, undone look proving that the beehive could be both edgy and cool.
By late 2008, Adele made the beehive her red carpet staple, often pairing it with her signature winged eyeliner for a chic, retro vibe that’s both glamorous and timeless. And don’t miss Beyoncé in her “Why Don’t You Love Me” video, where she channeled vintage elegance with a modern twist, making the beehive her own.
Whether you prefer the polished perfection of Presley or the bold, textured styles of Winehouse and Beyoncé, these celebrities prove that the beehive is endlessly adaptable, offering something for everyone to love. Choose your favorite muse and make your own style statement—it’s there for the taking, and it was started by the very best.
The origins of the beehive
Before we dive into the how-to, let’s take a moment to appreciate where the beehive really came from. This hairstyle is a piece of history, born in a Chicago salon back in 1960. Margaret Vinci Heldt, the woman behind the magic, was tasked with creating something entirely new for a magazine shoot.
Inspired by her favorite fez hat, she crafted a towering hairdo that defied the norms of low-volume styles that were popular at the time. When she placed a decorative bee pin into the model's hair, the iconic "beehive" name was born.
This style took off, and before long, it was everywhere—from the streets of Chicago to the glitz of Hollywood. It was the go-to look for any woman who wanted to make a statement, and it quickly became synonymous with the rebellious spirit of the ‘60s. But the beehive didn’t just stay in the past. It’s been making comebacks ever since, gracing the heads of modern-day icons like Amy Winehouse, Adele, and even Beyoncé.
Why? Because it’s a vibe, duh. It’s the kind of look that says you’re here to be seen, and you’re not afraid to take up some space. And honestly, isn’t that the energy we all want to channel sometimes?
Remember, you’re not just doing your hair. You’re stepping into a legacy of women who weren’t afraid to stand tall and proud, with a hive of hair to match.
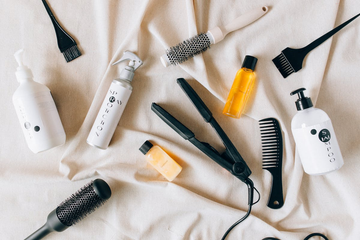
Tools of the trade—what you need to build the perfect beehive
Before we dive into the step-by-step guide, let’s talk tools. Call us tradesmen, because girl, this is hard work.
The beehive isn’t just a chuck it up and hope for the best hairdo—it’s a structured, sky-high style that requires the right gear to get it just right. You wouldn’t try to paint the Mona Lisa with a box of crayons, right? Same goes for your beehive. Here’s what you’ll need to make sure your hive is as high and mighty as it should be.
- First up: a teasing comb. This is non-negotiable. The teasing comb is your best friend for building volume and creating that signature beehive height. You’ll also want a fine-tooth comb for smoothing out the outer layers and making sure everything looks polished, not frizzy.
- Next, hairspray—lots of it. A strong-hold formula is essential for keeping your beehive in place all day (and night). Think of it as the glue that holds everything together. And don’t forget your bobby pins—a beehive isn’t going anywhere without these little guys. They’re your go-to for securing sections of hair as you build up your hive.
- If you’re going for an extra polished, modern twist, you might want to add a styling tool like the TYME Iron Air Pro Grade. This game-changer is perfect for adding curls or waves before you start teasing. The cool-air vents set your style instantly, making sure your beehive has that perfect balance of volume and smoothness.
- Lastly, a good round brush and hair dryer will help you create the initial lift at your roots before you start the heavy-duty teasing. And if you’re really going for it, a hair rat or padding can be used to give your beehive extra height and shape.
Step-by-step guide to building your beehive
Now that you've got your tools, it's time to get down to some hair-raising business. Creating a beehive might seem intimidating, but with these TYME-approved steps, you’ll be making hair history in no time. So, let’s break it down real slow.
Step 1: Prep your hair
Start with clean, dry hair. If you’ve got naturally fine or silky hair, a bit of texturizing spray will be your best friend here. It’ll give your hair the grit it needs to hold the volume and stay in place. Plus, it helps the teasing process go a whole lot smoother.
Step 2: Section and tease
Divide your hair into three sections: front, middle, and back. Start with the middle section, which will form the bulk of your beehive. Take your teasing comb and start backcombing from the roots. The key here is to tease in layers—small sections at a time, working your way up to the crown. The more you tease, the bigger the beehive. And FYI, this isn’t the time to be shy with your teasing. Channel your inner Amy Winehouse and go for it.
Step 3: Smooth it out
Once you’ve teased your way to new heights, it’s time to smooth things over. Gently comb the top layer of your teased section to smooth out the outer appearance, but be careful not to undo all your hard work. You want to keep that volume intact while creating a clean look.
Step 4: Secure the hive
Gather the teased section and start shaping it into the classic beehive silhouette. Tuck the ends under and secure everything with bobby pins. Don’t be afraid to use plenty of them—this hive isn’t going anywhere.
Step 5: Work on the front section
It’s now Tyme to turn your attention to the front section of your hair. Depending on your vibe, you can either go for a sleek side part, vintage bangs, or a voluminous front poof. Once you’ve styled the front to your liking, gently blend it into the rest of your beehive, securing it with pins as needed.
Step 6: Lock it all in place
Finally, grab your strong-hold hairspray and go to TOWN. Give your beehive a generous spritz to lock everything in place. Oh, and if you’re feeling extra, you can add a bit of shine spray for that sleek, polished finish.
Ready, set, get backcombing!
See? It wasn’t as hard as you’d think. From the polished era of Priscilla Presley to the rock-chic queen Amy Winehouse and the modern glam of Adele, this iconic updo has proven that it can adapt to every era and every single personality.
So, grab your teasing comb and start unleashing your inner vintage vixen. If you're aiming for that undisputed ‘60s crown or a contemporary, effortlessly cool, the beehive is all about making a true statement.
Now, tease, spray, and strut with attitude. The beehive is back, and it’s here to stay.