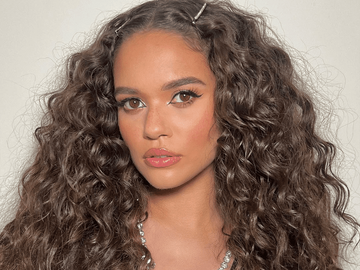
The perfect mermaid hair routine is just a scroll away. Keep going, girlie.
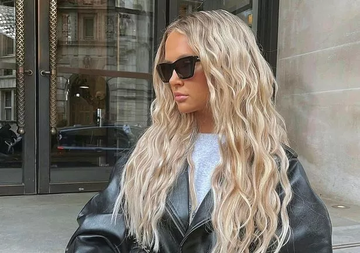
It might be winter, but that doesn’t mean summer waves are off the table. In fact, there’s something about soft, tousled curls that makes even the coldest months feel a little warmer. Beach waves aren’t just a hairstyle—they’re a mood, a whole energy shift, the kind of effortless glam that works just as well with a chunky knit and knee-high boots as it does with a bikini and sun-kissed skin.
The challenge? Getting them to ACTUALLY last. Too often, curls either drop before you’ve even left the house or turn into stiff, overdone spirals that are anything but effortless. The sweet spot is that perfectly undone, natural texture—the kind that makes it look like you just happen to have great hair.
Luckily, it’s not as complicated as it seems. With the right technique and a few expert tricks, you can create long-lasting beach waves that hold their shape without feeling stiff. All you need is the right curling iron, a little know-how, and the confidence to pull it off. Because nothing says main-character energy like a good hair day.
Your hair deserves a vacation—beach waves, incoming
Okay, so maybe it’s 30 degrees out, and your winter wardrobe is 90% oversized sweaters and wool coats. But who says you can’t bring a little summer energy into the mix? Enter: beach waves. They’re effortless, they’re cool, and they instantly make you feel like you just got back from a coastal getaway—even if the closest thing to the ocean you’ve seen lately is your phone’s lock screen.
But before you start wrapping random sections of hair around a curling iron and hoping for the best (we’ve all been there), let’s talk strategy. The ticket to nailing that perfectly undone, model-off-duty wave? A little prep work. The difference between a Pinterest-worthy wave and one that falls flat in 20 minutes is all in the details.
First, start with a clean slate. Freshly washed hair? Cool. But if you’re on day two (or three—no judgment), a quick cleanse with dry shampoo will absorb excess oil and add texture. Speaking of texture, if your hair tends to fall flat, a volumizing mousse or salt spray is your new bestie. Work it into damp hair, rough-dry, and you’ll already have a little body before heat styling even enters the chat.
Now, let’s talk grip. If your hair is naturally silky, curls will slide right out unless you give them something to hold onto. A lightweight styling primer or a texturizing spray will create that perfect lived-in feel without weighing things down. And here’s a trick straight from the pros: spritz dry shampoo at your roots before you curl. Not only does this boost volume, but it also keeps your scalp from getting greasy too fast—because we all know the goal here is to stretch this style for days.
Lastly, never, EVER skip heat protectant. You wouldn’t put your skin in the sun without SPF, right? The same goes for your hair. A lightweight thermal spray locks in moisture, prevents damage, and helps set your curls so they don’t fizzle out before happy hour. Now that your prep game is strong, let’s talk curling.
Time to curl—the technique you need for beach waves that won’t quit
So, here’s the deal. You want beach waves that last, and trust me, it’s all about technique. Don’t worry—you won’t need a salon degree for this. With a little patience and a few professional tips, you’ll be rocking mermaid waves for the long run.
Step 1: Prep your hair
Start with clean, dry hair (a little texture spray for grip goes a long way), and make sure it’s detangled. Brush through your strands to avoid any snags while curling. Your hair should feel soft, but not too slippery.
Step 2: Section it out
Don’t go diving straight into curling without properly sectioning your hair. Divide your hair into 2-3 sections (depending on thickness). Clip the top layers out of the way to focus on one section at a time.
Step 3: Grab your curling iron (preferably with a clamp)
Pick up your curling iron and set it to medium heat. Too hot and you’ll risk frying your hair; too low, and the curls won’t hold. We’re talking 350-400°F (175-200°C)—just the sweet spot. Aim for a barrel size of 1-1.5 inches. Bigger barrel = looser waves; smaller barrel = more defined curls. Got it?
Step 4: Wrap, but don’t race
This is where the magic happens. Start by grabbing a 1–1.5-inch section of hair and wrapping it loosely around the curling iron barrel. Hold it there for 5–8 seconds. Pro tip: Leave the top 2 inches of hair out of the curl to keep things natural and effortless. You’re going for waves, not tight curls, so don’t twist too tightly.
Step 5: Alternate directions
Now, switch it up. Curl some sections away from your face and others towards it. This creates a more lived-in, messy wave that looks totally authentic—not like you spent hours getting perfect curls. It’s all about the undone vibe, girl.
Step 6: Let it cool and don’t touch
Once you release the curl, leave it alone for a few seconds to cool down. It might be tempting to run your fingers through it, but resist the urge! Letting the curl set ensures it lasts longer and holds its shape.
Step 7: Finger-comb for that lived-in texture
When all your hair’s been curled, go in with your fingers to gently loosen the curls. This helps create that beachy, tousled finish we’re after. A light mist of texturizing spray can enhance the waves and add volume for that perfect beach-baddie look.
Step 8: Lock it in
Finish with hairspray. But don’t just spray and PRAY! Go for a light-hold hairspray to keep your waves in place, but avoid anything too stiff or crunchy (no one needs helmet hair). Hold the can about 6-8 inches away from your head and lightly mist your hair. Focus on the ends to keep that soft texture in place. This way, you’ll keep your movement, but those waves won’t frizz up like you’ve been caught in a monsoon.
Simple tips for beach waves that last all day
You’ve got the technique down, but how do you make sure your beach waves actually last from your morning coffee run to late-night plans? We’re all about the hacks that keep your waves fresh and flawless, even if the weather’s working against you.
1. Skip the heavy products
The way to get perfect beachy waves is to avoid anything too heavy. Creams, oils, and serums can weigh down your hair and make your curls fall flat. Go for a light mousse or texture spray to add volume and grip without turning your hair into a greasy mess. Bonus points if it has a little sea salt for that authentic, salty air vibe.
2. Let your curls cool completely
Here’s a mistake you’re probably making: touching your curls too soon after they’ve been curled. Don’t rush it. Let those curls cool fully in place. If you mess with them while they’re still warm, you’ll end up with limp waves instead of voluminous, bouncy ones. Trust me—patience pays off.
3. The right hairspray is your BFF
Light-hold hairsprays are your ticket to long-lasting waves without the crunchy texture. Spritz the spray lightly over your finished hair and then tousle it with your fingers. It’ll lock everything into place while still allowing movement. No one likes a stiff beach wave.
4. Avoid touching your hair too much
We get it, beach waves are tempting to touch. But the more you run your fingers through your hair, the more you’re breaking up those curls. To maintain your waves throughout the day, try to keep your hands out of your hair as much as possible. If you do feel the urge to touch up, use a curling iron to gently re-curl a few strands.
5. Don’t underestimate dry shampoo
If you’re in between washes and want to add a little texture, dry shampoo is your secret weapon. It’ll refresh your waves while giving them that messy, lived-in look. Plus, it’ll add volume, so your waves will look even fuller and more bouncy.
6. Set with a cool shot
Once you’ve finished curling, set everything in place by shooting a blast of cool air from your blow dryer. This helps lock in the curl and reduces frizz—perfect for when you’re dealing with humidity or unpredictable weather.
Go get those beach waves, girl!
And just like that, you're ready to wear those beach waves all year long—snow outside or not. Whether you're chilling on your couch or hitting up happy hour, these waves will have you looking like you just stepped off the sand. It’s all about having fun with your hair and not stressing over perfection. Because, really, who needs perfect when you can have cool-girl waves that actually look like you’ve spent zero time getting them just right?
Now, go forth and grab that curling iron and take your mane on the vacay it deserves. Your mermaid waves are waiting, babe. And trust us, they’ll be the hottest thing about your day.